


Été comme hiver, une belle manucure c'est une affaire de tous les jours. Pour celles qui aiment garder de belles mains douces, de beaux ongles, limés et manucurés le plus longtemps possible voici de bonnes astuces qui devraient faire l'affaire.
Une bonne base, assure une longue tenue
Tout comme pour le maquillage, la manucure demande une base propre, en bonne santé et bien préparée. On s'en doute, des ongles cassants, fragilisés et malades ne vont certainement pas faire tenir notre manucure plus de quelques jours, il est donc important d'en prendre soin avant toute pose de manucure.
Découvrez notre sérum ongles
Lavage et soin des mains
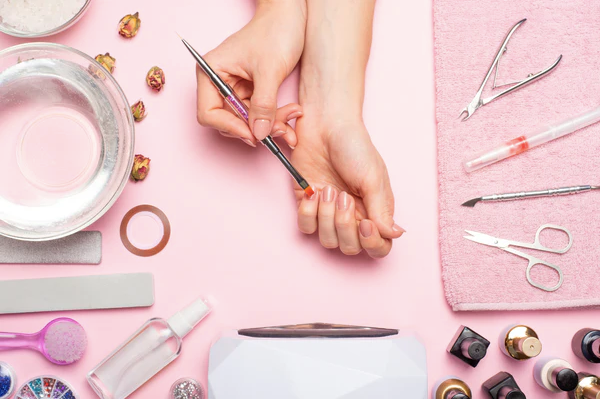
Ça paraît tout bête, mais on pense rarement à se laver les mains avant de poser son vernis. Pourquoi est-ce si important ? Se laver les mains permet d'enlever tout résidu gras, poussière ou micro éléments (comme un cheveu par exemple), qui pourrait compromettre la bonne pose du vernis. Ensuite on passe au soin ! Dégagement des cuticules, crème adoucissante pour la peau, petit massage pour le plaisir et taillage des ongles éventuels selon ce qu'on préfère : ongles courts ou ongles longs !

On ponce légèrement la surface de l'ongle.
C'est une étape qui est bien souvent zappée par manque de temps où simplement parce qu'on ne la juge pas nécessaire. Pourtant, tout comme la peau doit être hydratée pour supporter au mieux le maquillage, l'ongle doit lui aussi être poli (très très légèrement) pour adhérer le vernis au max et assurer une tenue longue durée. Avec une lime à ongles ou un bloc ponce ongle, on va légèrement poncer la surface de l'ongle jusqu'à ce qu'elle nous paraisse lisse. On veille à ne pas y aller trop fort car le ponçage extrême de l'ongle est très mauvais et risquerait de le mener à la casse ou la fissure (et ça, ça fait mal!). Pensez aussi au limage des ongles pour leur donner la forme voulue avant la pose du vernis. Ongles en amande, ongles carrés ou ongles arrondis ? À vous de voir. Enfin, on termine par passer une brosse à ongles afin d'éliminer les résidus du ponçage et lisser la surface des ongles.
Étape 3 : on protège ! Tout comme on protège sa peau des UV, de la pollution et des cosmétiques dont on l'affuble, l'ongle aussi mérite d'être protégé avant toute pose de vernis. Pourquoi ? Sur le long terme, on le remarque très vite, l'ongle jauni au contact permanent des pigments du vernis (qui rappelons-le, reste une substance chimique!). Il peut aussi se dédoubler et se casser. Pour éviter le maximum de désagréments on veille à poser une couche de base transparente avant chaque manucure maison. Notons que la base permet aussi une application plus uniforme du vernis à ongles, elle aide aussi à durcir l'ongle pour éviter la casse, et permet une meilleure tenue dans le temps. En bref, elle a tout bon.
Vous pouvez aussi ajouter une couche de sérum ongles histoire d'assurer la double protection !
Appliquer son vernis de la bonne façon

Découvrez notre sérum ongles
Il ne s'agit pas de passer un coup de pinceau à la va-vite et puis on s'arrête là. La pose de vernis c'est tout un art qui se respecte et qui s'apprend ! Évidemment, avec un peu d'entraînement, de patience et d'envie, on peut très facilement maîtriser la pose parfaite, étape par étape.
Étape 1 : le vernis s'applique par couches de vernis successives et non en un seul coup de pinceau garni à rabord de texture… On évite le pâté ! On fait les choses bien. Le mieux reste de laisser chaque couche sécher avant la nouvelle pose.
Étape 2 : on prend son temps. On ne veut pas de couches mal étalées qui pourraient laisser de vilaines stries une fois séchées. Il est important d'appliquer minutieusement chaque couche de vernis afin de veiller à remplir absolument toutes les zones de l'ongle.
Étape 3 : on n'oublie pas de border. Quèsaco ? C'est cette technique qui permet de remplir tout l'ongle de manière optimale et surtout faire tenir le vernis un peu plus longtemps. Le surplus sera enlevé par la tête d'un coton tige imbibé de dissolvant où à l'aide d'un stylo dissolvant. Pour la dernière étape, on veille à vernir le bout de l'ongle (de manière horizontale) pour épaissir l'ongle et « fermer » la pose de vernis.
Laisser poser, sans se précipiter
La pose de vernis pour une manucure parfaite demande du temps. Il vaut mieux éviter d'avoir une course à faire après ! On se libère toute une après-midi s'il le faut, pour être certaine de ne pas ruiner la pose au moindre accrochage… Comme on le faisait remarquer plus haut, il est essentiel de laisser sécher chaque couche avant une nouvelle application. Ce temps de pause va permettre au vernis de s'étendre et de se poser au mieux.
- Une petite astuce pour accélérer le temps de séchage ? Passer les ongles sous l'eau glacée et laisser sécher ses mains à l'air libre.

Découvrez notre sérum ongles
Indispensable, terminer sur une touche de top-coat
Le top-coat c'est la base… de la fin ! Pour boucler une petite session manucure maison on s'assure bien entendu de garnir les ongles colorés d'une dernière couche de top-coat. Ce vernis spécial se décline sous plusieurs formules, dont celle qui accélère le séchage ! D'autres ravivent la couleur, la brillance, assure la tenue et fortifie même l'ongle. Comme la base de vernis, le top-coat est un indispensable à ne pas oublier si on souhaite une manucure qui dure et un ongle brillant, tout comme une manucure professionnelle.
Et la retouche alors ?
En général on y échappe pas. La retouche manucure s'opère (si les premières étapes ci-dessus ont bien été respectées) au bout d'une semaine (pour une manucure standard, évidemment pour du semi-permanent on en compte trois de plus!). Rien de bien méchant ou de bien compliqué. En général on la plie en quelques minutes mais encore une fois, il faut qu'elle soit bien faite.
- Pour reprendre un petit accro sur un ongle dont le vernis s'est écaillé, il n'est pas nécessaire de tout enlever (le dissolvant reste au placard). Il suffit d'appliquer une légère dose de vernis sur la partie concernée et de l'étaler de sorte à ce que les précédentes couches se fondent elle aussi avec la nouvelle pose. On termine par une fine couche de top-coat et le tour est joué.
En vacances, pour éviter la cata on veille à ramener dans son vanity, une lime à ongle, un coupe ongle, son vernis, son sérum ongles et son top coat ! De cette façon impossible de se laisser surprendre par du vernis écaillé, un ongle écorché ou tout autre accrochage qui pourrait nuire à notre manucure pourtant préparée avec soin !


